
EDUCation
- Dahlia Classification
- Soil Health
- Growing Dahlias from Seed – Gathering Seeds
- Growing Dahlias from Seed – Starting Seeds
- Facebook post on Harvesting Dahlia Seeds from the Dahlia Society of Victoria, Australia
- Checking and Waking up your Tubers
- Dealing with Rot on your Tubers
- Planting your Tubers
- Growing Dahlias in Pots
- PowerPoint PDF – Waking your Tubers & Preparing for Spring – Cathrine Featherby
Dahlia Classification
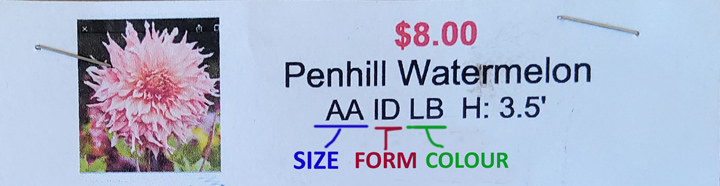
Dahlias are classified by size, form and colour. You can download a full list of classifications and their abbreviations here.
For a complete listing of named dahlias visit the American Dahlia Association on-line Classification Guide .
Soil Health
Dahlias prefer soil that is:
Click here for more information on how to have healthier soil.
Growing Dahlias from Seed
Gathering Seeds from Dahlia pods
We grow our dahlias from tubers because that way we know what we are getting (each tuber cut from a clump will produce the same flower). However there is another way to grow dahlias and that’s from seed. With this method you are never quite sure what you are going to get because the seed is a result of pollination from two different plants.
Some growers pollinate by hand some they can control the process and attempt to combine the qualities for two specific plants. The rest of us pollinate randomly by letting bees do what they do.
So how does one go about collecting seed so they can plant it in the spring and see what comes up? Here is the answer:
- Wait until the seed pod has dried a little (it is no longer green)
- Squeeze the seed pod. If you feel like there is something in there that something will be the seeds.
- Cut the seed pod from the plant and store it in a dry place to let it fully dry out.
- After you have finished putting your tubers to bed for the winter peel open the seed pods and collect the seed.
- Remember to label the seed with the name of the parent plant.


Starting Dahlia Seeds
Let’s start with soil. Many people make their own soil combinations and they can contain perlite, vermiculite, washed sand, spaghnum moss, peat moss, in addition to potting soil. Different combinations of these (and maybe other additions not listed here) can be created depending on what you like to grow. For starting dahlia seeds, a combination of peat, perlite and vermiculite is recommended and the process is not unlike starting vegetables indoors.
Fill your seed starter pots with your potting mix. Pour boiling water slowly over the mix (be careful of steam!) and let sit 10-15 minutes to cool. What the boiling water does is to help kill off any molds or fungus that create “damping off”. You don’t want to lose any seedlings to damping off. You could also use something like “Damp-Aid” to protect your seeds, and you can make something similar out of ground cinnamon and ground cloves. All you need to do is dust your seeds with it before planting.
Plant your seeds! I’m a fan of what is unglamorously called, “The Plastic Baggie Method”: put your pots in a plastic bag. The small Ziplock Freezer bags work perfectly for my 2.5″ square pots, but use whatever size will cover your pots. Now you will need light and warmth. You could place your sealed baggie in a warm, sunny window or under grow lights; either way is fine. Check on them every so often to see if any have sprouted.

Once your seeds have sprouted, leave them in the plastic bag until there are at least two sets of “true” leaves, and then remove the plastic bag. Keep seedlings out of direct sun but in bright light at first, and keep well-watered (but not soggy). Pot them up as needed.
When it is time to plant your baby dahlias in the garden, or outdoor containers, first harden them off for a few days by gradually exposing them to cooler outdoor temperatures. The best type of day to plant seedlings is an overcast or rainy day, towards the end of the day. This helps the dahlia seedling to cope with the shock of being planted without having the sun beating down on it as well.
Growing dahlias from tubers
by Cathrine Featherby
Checking and waking up Tubers
In February/March, check on your stored tubers. Mine come in from the cold garage at the beginning of February and I’ll keep my tubers in the house to warm them up. I like some tubers ready for mid-March as I’m often selling by then.
The tubers are stored in plastic bags with a combination of vermiculite and wood chips, and then in styrofoam boxes. The bags have two holes for a bit of air circulation. Each bag is opened and the tubers checked.

The crown area is carefully brushed off with a soft, small, paint brush to remove any debris covering the eyes. Note the photo with the tuber just coming out of the bag followed by the one with the cleaned crown area. Be gentle as some eyes might already be growing and you don’t want to break them off. They will often produce new eyes from that area but it takes awhile.

After the crown area is cleaned up and the tuber or tubers checked, they’ll go back into the bag with a suitable amount of vermiculite and wood chips. Usually less than before. This is so the wood chips and vermiculite can be lightly spritzed if the tubers start to look dry with skin getting wrinkly.
The crown of the tuber will be facing up with the eye area visible as shown in the last photo. That way I can watch for developing eyes. Once the tubers show visible, growing eyes they can be placed back into the cold (for me the garage) until you want to pot them up, plant them, sell them, or give them away. They all develop eyes at different times so this method works well for me.
If you have tubers that are not showing eyes, place them in trays with soil, pet chips or some other medium spread over them. Place the trays in a warm room or greenhouse (at 18 to 20 degrees) and watch for them to “eye-up”.

Dealing with Rot on tubers
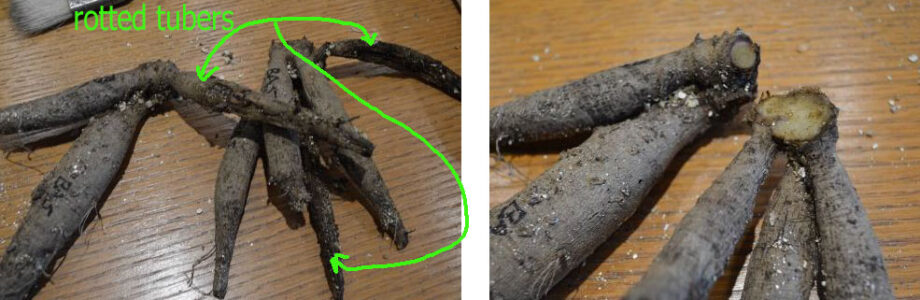
When checking tubers and tuber clumps you might find some rotten areas, along with good tubers as seen in the first clump photo. Remove all the bad areas, trying to save as much of the eye area as possible, as seen in the second photo. After cleaning up the clump so no rot is left, I cover the cut areas with a good dose of cinnamon.
One thing I’ve noticed is that often it’s the same tuber variety that is difficult to over-winter while other varieties make it through every year with no problems. This winter(2025) was very wet and digging up such wet tuber clumps in the fall made it harder to over-winter them.
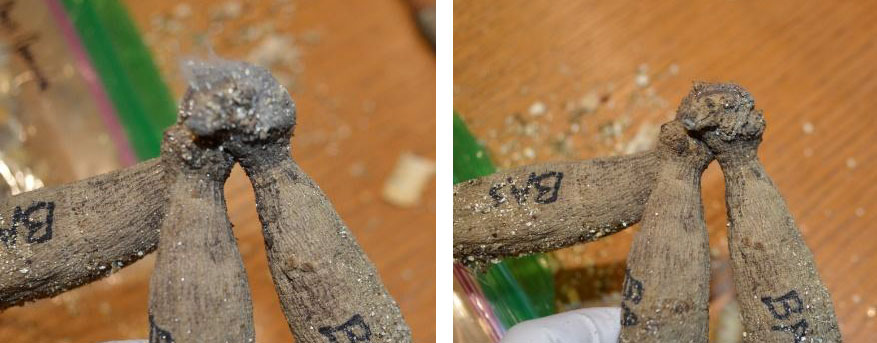
If you find fuzz and discolouration on the cut area of your dahlia tubers (as seen below) don’t chuck it. It’s not always rot. This can usually be cleaned off with your brush, leaving a clean surface underneath. I reapply cinnamon to the cut area.
Planting your tubers
Place “eyed” tubers in pots with slightly moist potting soil (Sunshine #4 works well). Place the pots in a sunny protection location (inside by a window or in a greenhouse or cold frame). Avoid placing beside a hot window which could cause the tuber to dry out. Give the pots minimal water. Dahlias do not like a lot of water at this stage but at the same time don’t like to dry out.
While your dahlias are getting started in their pots you can plan out your garden beds. Think about the height of your dahlias so that you do hide a short one behind a tall one. Recommended spacing for dahlias is 1m (3ft). This provides space for air circulation and for pruning. Your dahlias will need at least 6 hours of sun per day and soil with good drainage. This is also a time when you can get your soil tested for PH and nutrient levels so that you will know what amendments are will be needed for optimal performance.
Planting can occur between mid April and mid May depending on weather and soil conditions. Give the soil a chance to warm up before planting and avoid planting in soggy soil. If there is a risk of frost you will need to cover you plants or just hold off on planting until frost season is over.
Dig a hole 12″ deep and about shovel width wide. Drive a 4 to 5 ft stake into the edge of the hole. Place a small amount of fertilizer (such as 6-8-6) and bone meal into the hole. Cover the fertilizer with about 6″ of soil. For tubers with eyes but not but stems and leaves place the tuber in the hole with the growing tip facing up and as close to the stake as possible. Leave a small indentations at the top of the hole for watering.

For tubers that are already growing make the hole shallower and add your fertilizer. Place the plant so that the tuber is slightly below the soil surface.
There are still two important things to do once your tuber is in the ground. First is to tie a tag with the dahlia name to your stake. Second is to apply your choice of slug and/or earwig deterrent. You don’t want your dahlia to be eaten before it has a chance to reward your efforts with some beautiful blooms.

Growing Dahlias in pots
Dahlias make excellent potted plants. Cathy Featherby has kindly provided some instructions on how to get the best out of your potted dahlias:

POT SIZE
Use a good size pot – 5 to 7 gal. for larger plants and any size pot for the smaller dahlias like Mignon Singles which are very small plants. These little plants are wonderful in a mixed arrangement as the center plant.
GROWING MEDIUM
2/3 good potting soil
1/3 compost (homemade or purchased)
Some lava rock (very reasonable at Integrity Sales on Keating X Rd.)
Use a strong tomato cage for larger plants so they will not break in the wind.
FOOD
Dahlias are heavy feeders so I provide some organic fertilizer and bone meal to start, mixing it just below the roots. Fish or seaweed fertilizer is good for additional micro nutrients.
Once the plants get growing I add some 20/20/20 (usually liquid).
In July I start to use 8/24/16 for the beautiful blooms. Integrity Sales provides this fertilizer specially made for dahlias. As long as there is a higher center number it will help the blooms. I use granular and liquid at different times. The liquid fertilizer can be diluted and sprayed on the plant following manufacturers instructions.
Instead of following the above you can purchase slow release fertilizer and use that. The one I use for gift plants is 14-14-14. I also suggest adding a bit of fertilizer throughout the summer with the higher center number for blooms.
SLUGS:
Put some Safer’s slug bait in and around the pot to protect from slugs.
MILDEW:
Later in the season (mid July) remove bottom leaves to improve air circulation. If you see any mildew on leaves carefully remove those leaves immediately and wash before touching plants. If you do get mildew you can check the internet for natural ways to handle it. Periodic foliar feeding helps as a preventative. Plants that get mildew are often stressed so check to see your plant is receiving the right amount of water and food.

EARWIGS:
We use metal stakes for tying our plants. You can add a stake of any kind to your dahlia pot. We put a second pot upside down on top of the stake. Inside the pot we put a loosely folded napkin. Use the top of the stake to hold the napkin in the pot. Earwigs go into the napkin in the early morning and remain there until dusk. They usually attack plants after the first month when the foliage is getting larger and buds starting. Put some water and a bit of dish soap into a bucket. Carefully remove pots from stakes and napkins from pots and shake out over the soapy water. Earwigs will drown and you will have earwig free blooms to enjoy indoors.
Leafy and Crown Gall Disease

The first program available is about Leafy and Crown Gall, diseases that can afflict your dahlia tubers. As gall is becoming more common, this information was seen as the most important to provide as our first program.
If you are growing dahlias, please click here to download this informative presentation on Leafy and Crown Gall. There’s a bonus at the end – photos of Cathy’s masterful garden where dahlias play a leading role.
Is it Crown Gall or Leafy Gall? by Melodie L. Putnam and Marilyn Miller of Oregon State University provides more information on the difference between Leafy and Crown Gall.
European Wall Lizards

At our June 2025 meeting a question came up about the European Wall Lizard – is it a garden pest or a beneficial predator eradicating garden pests?
The jury is still out on this one, but here is a link to an interesting article by Lisa Houle – Invasion of the European Lizards on the BC Invasive Species Council of BC website. Very little concrete information is known about the habits and life of the European Wall Lizard on Vancouver Island. Gavin Hanke, Curator of Vertebrate Zoology at the Royal BC Museum, has been involved in a research project regarding the Wall Lizard. In this short YouTube video he discusses his research (as of 5 years ago) and how we can all help to understand this creature a little better. A big thank you to Cathy Featherby for researching this hotly debated topic.
Pest control Strategies
The discussion below dates back to a 2013 VHS presentation on pest control.
Earwigs
The “big” growers in our club have offered some ideas as to how they manage the pest problem with dahlias. Some other ideas have been gleaned from the Internet, with website addresses given where you might want to check out a Youtube video or read for more detailed information. Happy hunting!
- Barry: use 2 ½ inch plastic pots and paper napkins from Costco – check every 2 days
- Cathy: earwig traps Internet: containers with narrow slits near base, filled with a little oil – they crawl in and drown. Refill with oil as needed (google “how to make an earwig trap – chemical free” e.g.– http://www.youtube.com/watch?v=5gJNZd4mp4Y Internet: another oil idea – use shallow tin cans (tuna, cat food, etc) and fill with ½ inch of oil – place a ground level Internet: rolled up, dampened newspaper laid in beds – shake out in the morning into soapy water (or a short length of hose); fill a flowerpot with crumpled, dampened newspaper – place upside down on ground, propped up with a stick; bait a container with pencil-size holes in sides with oatmeal or bran; beer baits – jars on sides (might get slugs with one too!)
Aphids
- Barry: no sprays but hand squeezing on a daily basis when seen
- Cathy: Safer’s Trounce (on contact only so no residue to harm beneficial insects)
- Ryan: Safer’s Soap (but watch out for residue affecting blooms and leaves)
- Internet:
- hand crush ;
- snip off affected section;
- encourage or purchase ladybugs and lacewings;
- plant mint, fennel, dill, yarrow, cosmos, larkspur, asters, zinnias, nasturtiums to attract aphids to those plants;
- plant garlic and onions near dahlias – aphids don’t like the smell;
- use a homemade garlic spray on aphids. Mix crushed garlic and water together, allowing the water to become infused with the scent of garlic. This smell acts as a deterrent against aphids, driving them away;
- create a home remedy to protect your plants against aphids. Mix together 1 cup of vegetable with 2 cups of water and 2 teaspoons of bleach-free dish soap. Put the mixture in a spray bottle and spritz it on infected plants to suffocate the aphids. Keep the treated plants out of direct sunlight, however, since the spray could magnify the light and burn the leaves.
- Blast aphids off of the plants with a strong spray of water. Nothing is more eco-friendly than water! As aphids are attracted to the color yellow, a bright yellow pan one-quarter full with water will draw aphids, who will then land on the water mistaking it for a plant, sink, and drown.
- Reduce your use of fertilizer heavy in nitrogen; high levels of nitrogen helps aphids reproduce. An alternative is to spread out application of nitrogen instead of applying it all at once.
- diatomaceous earth. Diatomaceous earth (DE) appears as a fine talcum powder, and is made of miniscule fossilized water plants. DE is lethal to aphids and many other types of common pests, including fleas, ticks, flies, cockroaches, ants, mites, and earwigs.
Slugs
- Paul:At planting time, use Corry’s Slug Bait (no problem for his cat)
- Barry: Corry’s at planting; slug hunting at night which are then dumped into salt water and dumped next morning
- Cathy: Safer’s Slug bait at planting and later if necessary
- Ryan: resident frogs at Mill Bay plot!
- Judith: copper mesh over plastic collars (juice bottles, etc) at planting time (can remove collars or leave in place (use Coke or vinegar to remove tarnish)
- Internet:
- newspaper soaked in sugared water and placed under boards attracts more than just plain damp paper;
- use deep bait cups for beer or yeast mixes (½ tsp yeast, 1 tsp sugar, 1 tsp flour, 1 cup water)in yogurt containers buried to rim. Google “controlling slugs organically” http://www.youtube.com/watch?v=onctrmf_2Y4
- Iron phosphate containing slug baits – pet safe, last 2 weeks or more, act as fertilizer if not consumed (ex: Sluggo);
- grapefruit and orange halves (melon rinds also work) – discard slugs in salted water;
- 2 TBSP cornmeal in jars placed on their sides – desiccates the slugs! Google “how to kill snails and slugs” – http://www.weekendgardener.net/how-to/snails-slugs.htm
- avoid watering in the evening when slugs come out – water in the morning and soil surface will be dry by nightfall;
- use seaweed (dried is best) or coffee grounds as mulch. Google “natural slug control” – http://eartheasy.com/grow_nat_slug_cntrl.htm
Deer, rabbits
- Paul: totally lined property with nine foot high hedges
- Barry: high fence for deer; rabbits present a small problem at start but once plants are larger there is little damage from them
- Judith:
- “Wireless Deer Fence” – https://wirelessdeerfence.com/ – these can be moved around in the garden to surprise the deer;
- Bobbex on hostas, roses seems to discourage deer from coming into garden (try giant Q-tips with Bobbex!)
Mildew
- Barry: try to keep spraying to a minimum but if mildew shows up early, spray all plants near affected ones
- Cathy:
- keep good air flow by removing bottom leaves and those from inside the plants.
- Use foliar fertilizer to heighten resistance within leaves themselves.
- Remove mildewed leaves immediately and wash hands before touching any other plants.
- Internet:
- Homemade Sprays Research studies in 1999 and 2003 on infected zucchini and winter wheat (respectively) indicated that spraying cow’s milk slowed the spread of the disease. To try this at home, mix 1 part milk with 9 parts water and spray the stems and tops of leaves with the solution. Reapply after rain.
- Spraying leaves with baking soda (1 teaspoon in 1 quart water) raises the pH, creating an inhospitable environment for powdery mildew. http://www.organicgardening.com/learn-and-grow/powdery-mildew More on using milk (explains why it works & recommends ratios) http://www.growveg.com/growblogpost.aspx?id=242
Viruses
- Cathy: (yellow vein lines can indicate virus) – use clean shears/scissors for each plant when cutting flowers or cleaning up – 70% alcohol solution to “sterilize” between plants. When deadheading, just take off the flower heads by hand and then go back and cut stems with “sterilized” scissors. Chuck any unhealthy looking plants (NOT composted). Maybe try Epsom salts to see if a missing nutrient might be at root of discolouration before discarding.
Slide Presentations
Good and bad insects
- In 2022 member Cathrine Featherby developed this presentation on good and bad insects in the dahlia garden as well as diseases that may afflict your dahlias.
American Dahlia Society (ADS)
- has a wealth of information available on all things dahlia-related. If you have some time, wander through their site.
- Under the ‘Grow’ tab, the Dahlia University page contains a collection of videos and downloadable PDFs on a wide variety of topics including growing dahlias, identifying pests, etc.
- Under the ‘Research’ tab, the Virus research page contains valuable information about dahlia viruses
Pacific Northwest Dahlia Conference (PNDC)
- has a number of videos available on their resource page
- maintains a YouTube channel with several years of videos
- a complete history of dahlias, including family tree, species and timeline of the dahlia discovery and introduction in the Uk.
- an encyclopedia of dahlias from all over the world.